千锋长沙Java培训:HarmonyOS快速入门
近期华为的鸿蒙系统(HarmonyOS)在各大平台疯狂刷屏,可谓是出尽了风头,很多小伙伴都问有没有鸿蒙相关的开发教程,那么它来了!从今天起小编要更新一套千锋长沙Java培训讲师主讲的有关鸿蒙系统开发的系列教程。本篇文章讲解一下HarmonyOS快速入门:
1、创建xml布局文件
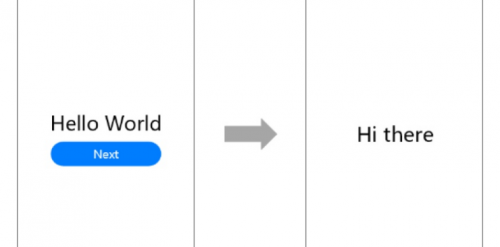
第一个页面内有一个文本和一个按钮,使用DependentLayout布局,通过Text和Button组件来实现,其中vp和fp分别表示虚拟像素和字体像素。“ability_main.xml”的示例代码如下:
<?xml version="1.0" encoding="utf-8"?>
<DependentLayout
xmlns:ohos="http://schemas.huawei.com/res/ohos"
ohos:height="match_parent"
ohos:width="match_parent">
<Text
ohos:id="$+id:text"
ohos:width="match_content"
ohos:height="match_content"
ohos:text="Hello World"
ohos:text_color="#000000"
ohos:text_size="32fp"
ohos:center_in_parent="true"/>
<Button
ohos:id="$+id:button"
ohos:width="match_content"
ohos:height="match_content"
ohos:text="Next"
ohos:text_size="19fp"
ohos:text_color="#FFFFFF"
ohos:top_padding="8vp"
ohos:bottom_padding="8vp"
ohos:right_padding="70vp"
ohos:left_padding="70vp"
ohos:center_in_parent="true"
ohos:below="$id:text"
ohos:background_element="$graphic:background_button"
ohos:margin="10vp"/>
</DependentLayout>
按钮的背景是蓝色胶囊样式,可以通过graphic目录下的XML文件来设置。
右键点击“graphic”文件夹,选择“New > File”,命名为“background_button.xml”,单击回车键。
<?xml version="1.0" encoding="utf-8"?>
<shape
xmlns:ohos="http://schemas.huawei.com/res/ohos"
ohos:shape="rectangle">
<corners
ohos:radius="100"/>
<solid
ohos:color="#007DFF"/>
</shape>
2、创建主程序
package com.sudojava.firstdemo.slice;
import com.sudojava.firstdemo.ResourceTable;
import ohos.aafwk.ability.AbilitySlice;
import ohos.aafwk.content.Intent;
public class MainAbilitySlice extends AbilitySlice {
@Override
public void onStart(Intent intent) {
super.onStart(intent);
super.setUIContent(ResourceTable.Layout_ability_main);
Button button = (Button) findComponentById(ResourceTable.Id_button);
// 点击按钮跳转至第二个页面
button.setClickedListener(listener -> present(new SecondAbilitySlice(), new Intent()));
}
@Override
public void onActive() {
super.onActive();
}
@Override
public void onForeground(Intent intent) {
super.onForeground(intent);
}
}
3、创建另一个界面
package com.sudojava.firstdemo.slice;
import com.sudojava.firstdemo.MainAbility;
import ohos.aafwk.ability.AbilitySlice;
import ohos.aafwk.content.Intent;
import ohos.agp.colors.RgbColor;
import ohos.agp.components.DependentLayout;
import ohos.agp.components.Text;
import ohos.agp.components.element.ShapeElement;
import ohos.agp.utils.Color;
public class SecondAbilitySlice extends AbilitySlice {
@Override
protected void onStart(Intent intent) {
super.onStart(intent);
//声明布局
DependentLayout layout = new DependentLayout(this);
//设置布局的宽度和高度
layout.setWidth(DependentLayout.LayoutConfig.MATCH_PARENT);
layout.setHeight(DependentLayout.LayoutConfig.MATCH_CONTENT);
ShapeElement shapeElement = new ShapeElement();
shapeElement.setRgbColor(new RgbColor(255,255,255));
layout.setBackground(shapeElement);
Text text = new Text(this);
text.setText("Hi Here");
text.setWidth(DependentLayout.LayoutConfig.MATCH_PARENT);
text.setTextSize(100);
text.setTextColor(Color.BLACK);
// 设置文本的布局
DependentLayout.LayoutConfig textConfig = new DependentLayout.LayoutConfig(DependentLayout.LayoutConfig.MATCH_CONTENT, DependentLayout.LayoutConfig.MATCH_CONTENT);
textConfig.addRule(DependentLayout.LayoutConfig.CENTER_IN_PARENT);
text.setLayoutConfig(textConfig);
layout.addComponent(text);
super.setUIContent(layout);
}
}
4、运行结果如下


猜你喜欢LIKE
最新文章NEW
相关推荐HOT
更多>>热门推荐
零基础必看的前端HTML+CSS教程
沸Java培训新手实战必备!单机版坦克大战分步实现项目源码
热3种Javascript图片预加载的方法详解
热长沙前端培训:一招教你用vue3+canvas实现坦克大战
新互联网凉了?参加长沙Java培训能找到工作吗?
长沙Java培训实战项目,出游咨询订票系统开发流程
不参加长沙Java培训能学会Java吗?2022Java技能学习路线图
千锋长沙Java培训分享之怎么学习Java集合?
千锋长沙前端培训分享之JavaScript面向对象编程思想详解
千锋长沙前端培训分享之web前端的回流和重绘
千锋长沙前端培训分享之3种Javascript图片预加载的方法详解
千锋长沙前端培训分享之利用Jest测试React组件
千锋长沙前端培训分享之JavaScript中Slice的用例
千锋长沙java培训分享之Socket编程


 京公网安备 11010802030320号